Monday, February 4, 2013

Shut Down Menu In Windows 8


To turn off a computer, you have to go to shutdown menu, you can't  disconnect it directly from the electric power source(desktop computer),  otherwise, if you are not lucky, you will get your data lost, corrupt in file, or even computer will not work at all.

Many things are different between Windows 7 and Windows 8, one is the way to shutdown the computer.

To Shutdown Windows 8
• Move your mouse cursor to the upper right corner, or you can use Windows(logo)+C (on the keyboard), then will appear the menu at the right side.
• Choose the Setting logo


• You can see the Power Button at this window, click on it
• Next, you can choose, Sleep, Shut down, or restart.
Other way to get the shutdown menu
• Sign out from your account
after sign out you will see the menu for log in,  and also you can see the shutdown button at the down right.


Solve Display Resolution Problem Windows 8 in Netbook

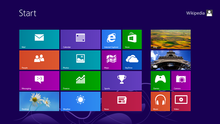
Windows 8 has a new look, displaying application menu on the screen, with attractive colors, named Start Screen.


But the Start Screen is not working to run the Applications on Windows 8 when the computer screen resolution below 1024 x 768 pixels.

Netbooks generally have a resolution of 1024 x 600 (below the minimum requirements of Windows 8), and when you try to raise the resolution, you can't do, because it is already in maximum.
In order to increase screen resolution in Windows 8 netbook, there is a trick,
follow the steps below :


Go to the Registry Editor (press windows logo + R, then type Regedit  , enter)
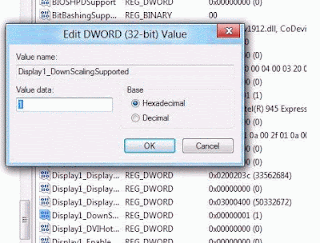
Search for dword: Display1_DownScalingSupported (copy and paste), use Ctrl + F to search, if you have found, double click on it, then change the value from 0 to 1, click OK, continue search by pressing F3, if discovered again, change its value from 0 to 1.


Then restart the netbook
Try to change the resolution. Right click on the screen, and select Screen Resolution, then (if there are no other problems) you can increase the resolution from 1024 x 600 to 1024 x 768. And now all Apps will work in Windows 8.


Sunday, February 3, 2013

How to Solve the Laptop Screen Flickering Problem

Lets shift the focus on laptop screen flickering problems & the ways to solve it. Today, laptops have become almost a necessity. Though Desktop users like me won’t agree with this, as we are used to working on a desktop.
But sometimes even I feel the need of laptops, mainly when I’m getting bored traveling around. But I’ve seen my friends having problems with the laptop’s screen.
It keeps flickering for a moment or two & it’s quite irritating to work on such a flickering laptop. You need to adjust the screen to certain again or hold the back case of the screen tightly in order to make the flickering disappear. So lets take a look at the ways to Solve this nagging Screen Flickering problems in Laptops.

1. Update your Video Card Drivers

Update video card drivers
Sometimes it’s not just the hardware which is causing this problem. Old Video Card drivers could also be the cause of this problem.
For updating your drivers, you first need to Find the manufacturer of the Video Card by right clicking on your Desktop >> Properties >> Settings tab. Then Google for the update of your driver.

2. Screen Refresh Rate

Screen refresh rate
A low Screen Refresh Rate can also cause Flickering Problems. Normally the Refresh Rate is set around 60 Hz. Today almost all LCD monitors are set to work perfectly for a Refresh Rate above 60 Hz.
If you’ve a good system then you can increase it beyond 60 Hz. Make sure that refresh rate is compatible with your system, else you’ll get problems in viewing two or more images where in you’ll find the top most image to be transparent.

3. Loose Connections

Laptop screen flickering due to loose connections[Image Credit]
Sometimes you may get your screen to flicker due a loose connection in the wire which goes from the motherboard to the LCD screen. If you are not experienced enough in handling hardware problems, then don’t refrain from consulting an Engineer who’ll do the job more efficiently.
Opening the back cover of a laptop & checking for problems is a difficult task. You may end up fixing the loose connection but another problem might arise during this process.
I hope these 3 Steps are enough for solving the Screen Flicker in your Laptops.


Saturday, January 26, 2013

Reasons of slow internet


Slow internet is one of the major causes which can hamper the pace of any business. Such slow internet speed can be caused due to any issues like configuration problems, interference in the wireless and broadband.
Causes why internet does not perform normally are:
  1. ActiveX controls
    Slow internet can also be caused due to the activation of Activex control which implies that the users can’t see a page due to some inactive settings.So, the users can remove the settings for these controls by downloading an internet Explorer patch of Microsoft and hence get rid of the problem of slow internet.  Reboot your computer after this patch has been downloaded on the PC.
  1. Viruses and spyware
    Slow internet connection can also be generated due to many kinds of issues like installation of viruses and spyware on your computer. Sometimes, the programs installed on the computer along with its memory, space of the hard disk also cause slow internet speed. Spyware installed on the computer can also be removed through deleting these programs through the PC’s control panel.
    The reason why the installation of spyware on the PC generates slow internet speed is because such software has a tab of all the online activities of a user. In fact the keystrokes of a user which imply the way he employs internet are included in his internet behavior. You must have reboot your computer many times in order to improve the performance of internet. But this can’t have any impact because slow internet speed is produced due to reasons like presence of several spyware on the PC.
  1. Number of operating applications
    Sometimes, use of several applications at once is also because of slow internet behavior. In that scenario, reboot your computer to remove the factor of slow internet speed.
  1. Browser settings
    Sometimes, the browser settings also have an impact in terms of slow internet pace. This can happen when the computer’s browser has many add-ons in terms of search extensions and programs for opening special documents.
    So, the user should remove all these add-ons in order to remove slow internet behavior. After removal of the add-ons, again reboot your computer in order to restore normal internet behavior.
  1. Router settings
    The kind of internet tool employed by the user also decides his internet performance. You can reboot your computer after adjusting these settings. These settings can also be affected by any physical obstruction between the modem and your PC.
    Sometimes, internet connections are slow from the service provider itself, so nothing can be done. Router settings can also be changed to make compatible with those desired by the internet service provider.
  1. Internet settings
    Reboot your computer option is tried by many people to remove the slow internet functionality, but it is not relevant for a low internet speed. A user can also reduce the days for which the history of web pages is stored. Just reboot your computer again after the number of days for which the page history is reduced to one. Encrypted pages which require user ids and passwords to be stored can also produce sluggish internet behavior. So, don’t save these pages in history. We provide competent solutions to remove the problem of slow internet.

Monday, January 7, 2013

How to Deal With the Windows Blue Screen Error?

“Blue” is one of the favorite colors of many people including myself but not when it relates to computer problems. The notorious “blue screen error” also known as the “blue screen error of death (BSOD)” is easily the most dreadful PC problem you will ever come across in your life. And the worst part is, it pops up frequently these days no matter what windows operating system you are using.
The blue screen error has more than one faces – and at least two that I have seen so far. Sometimes the error will show up and the PC will just die, and at other times it will keep rebooting the PC in cycles. If you see the 1st kind of error, an almost dead PC, it is often the less annoying face and easy to deal with. First thing you need to do is cold- restart and see if the error goes away. Most of the time, it will go away for the time being, and you wouldn’t have to worry about it for a while until it reappears a few days later. If you have a laptop, keep pressing the power button until it reboots or take the laptop’s battery off to do a restart.
If your PC on the other hand, keeps rebooting in cycles, this is a bigger problem. Try pressing the “F8” key, to get to the menu from where you can try booting in the safe mode and stop the continuous booting cycle.

Stop the Continuous Booting Cycle

1.  Go to the start menu. Right click on “computer” or “my computer” and select “properties
2.  Then choose “advanced system settings”. Press “yes” to confirm.
3.  Choose the “advanced” tab on the top menu. Then choose “settings” for “startup and recovery option”. You will get the following screen as in image 1 below.
4.  Deselect “automatically restart” and hit OK. By doing this, you have not fixed the blue screen error! You just stopped the PC reboot again and again.

Perform Checks when in Safe Mode

Go to “start menu” -> “control panel” – > Under “systems and security” select “find and fix problems” -> again “systems and security – the 5th option” -> select “check for performance”. After running this check, the system may recommend some options, like “a list of programs that you should stop running at startup”. Select those programs and go along with systems recommendation to stop those programs automatically run at startup except your antivirus program.
After completion of this performance check, reboot the PC and see if it boots, this time in the regular mode. If it boots alright, 1st thing to do is run a complete virus scan on your system. After the virus scan, go to the systems and security check again mentioned above (the 5th option) and run “fix problems with windows update”. Most of the time windows update will fix problem like this.
Even after doing the update, if you experience the blue screen error, you will need to start your event viewer, identify the problem that is occurring and take it to Microsoft support for a solution. I am going to talk about it little later.

The main reason a blue screen error occurs is – resource blockage due to your own system’s limitations or limitations that was created by a virus, malware or a spyware intentionally. Some programs or drivers may create a system bottleneck, and as a result your PC is failing again and again to access its resources that it needs to keep functioning. The PC finds no other option to keep processing with sufficient resources, and dumps all the data into a dump file before going to sleep.

Two Useful Tips – Blue Screen Preventive Actions

  • These days, we plug in so many USB devices and Bluetooth wireless devices into our PC or laptop. This is also a major reason for creating resource conflicts and shortages. Better not to use too many USB devices at once unless you really need them all together. More specifically, if you use wireless internet connections to connect to the internet, do not keep your wireless USB modem or the USB dongle plugged in to the USB port, when you start your PC or laptop. Let it start without it first, and when the booting process stops, then connect your USB modem into the slot. This tip is only for those folks who are troubled with this blue screen error, not for everyone.
  • Another important point to remember is not to run too many programs at startup. All the programs sitting on the right hand side of your taskbar could easily be a trouble maker. Evaluate if they are all from trustable sources, and if not get rid of them. When you have a program running on taskbar, it means you have given it as much freedom it needs on your PC to do a wide range of things including cracking your system resources if it wishes. If there is one such program that you feel creating some trouble and you also don’t need it much, just take it out of your taskbar and block it for some time and see the result.

How to Run Event Manager to Get Details Information about an Error?

Event manager keeps saving all the events that take place on your PC including errors and warnings. By using event manager properly, we can identify recurrent errors, and get detail information about it. Once we have the detail information, we can try to resolve it by ourselves, a techie or get in touch with Microsoft to have them check it out why it is taking place. Lets walk-you-through the steps on how to use the even manager;
  • Go to the start menu and “under search programs and files type “eventvwr” as shown in image 2 below.

  • After saying “yes’ on the user account control screen, the event manager windows as shown in image 3 will appear.

  • There are five types of events that take places and recorded in your PC. The blue screen error is more likely a system error, so go to the system events. You can see on the right side there are more than 59 thousands system events already recorded in my PC so far. Once you get inside the system events you will see a list of all the events starting from today and ending on the date when your PC was first configured with this operating system. Events that are related with an error or a warning will be marked as shown in image 4 below.

  • Considering the blue screen error occurred in your PC just a while ago, try to find this out from the list. It should be right somewhere below, marked in red, and easily identifiable. After you have identified it, click on it and get the detail information on it as shown in image 5 below.

  • Now as you have all the information about the error, you will be better equipped to look for a solution. You can search about it on Google or contact an IT expert who can help you with that. You should also contact Microsoft support center here: http://support.microsoft.com/select/?target=hub and ask them for a solution; they might remote login to your PC and fix it for you easily.

Tuesday, January 1, 2013

Top 10 Facebook tips

Below is a listing of our top 10 tips for the popular social networking website Facebook.
Hide users, games, polls, etc.
It quickly gets annoying seeing some users posts, game invites, polls, etc. Hovering your mouse to the right of the post and clicking the Hide button as shown below can hide any post. Once this button is pressed you'll be prompted with the option to hide that user or in the case of a Facebook application the option to hide that application from ever showing up on your profile.
Hide Facebook users, games, polls, etc.
To unhide someone or unblock an application click the Edit Options link in the bottom right corner of the news feed as shown below.
Facebook unhide friends
Greasemonkey and FB Purity
Although Facebook does not allow the ability to hide friends getting new friends messages, friends becoming fans of something, and some application messages they can still be hidden with browser add-ons. If you're running Mozilla Firefox, Chrome, Opera, or Safari we suggest installing the Facebook Purity add-on.
Update your privacy settings
Click Account in the top right corner of the Facebook window and then click Privacy settings to adjust who is capable of seeing what on your Facebook profile. We highly recommend going through all the privacy settings to verify your privacy is properly protected.
Anything that is not set to friends only or friends of friends can be seen by anyone searching on the Internet. Below is a few things we recommend for most users.
  1. Under Search in Privacy settings uncheck Public Search Results. This will prevent users from finding your account and profile picture in search results such as Google
  2. Under Application settings, make sure you're only allowing applications you want to have access to your information. Applications that you grant rights to can have access to your Facebook profile information.
  • If you're curious to see how a program or web page connect to the Facebook API can see your profile see Tip1.
Use the Facebook top bar for navigation
Facebook navigation
Knowing how to properly navigate is vital if you want to get the most out of Facebook. Below is a brief description of each of the available options in the top bar as shown above.
Home (facebook logo) - Clicking this logo will take you to your wall (News Feed) that shows all friends recent posts.
Friend requests - If any friend requests are waiting to be approved this icon will show a notification of how many friends are waiting for approval. This icon can also be clicked when you want to view any friend recommendations or search for friends on Facebook.
Messages - This section allows you to send and receive private messages between one or more people you're friends with.
Notifications - Any time a friend or Facebook application creates a new post you'll be notified in this section. Clicking this icon will show all recent notifications. If you wish to change what is capable of sending you notifications including any Facebook applications or games click the See All Notifications link at the bottom and check or uncheck what you want to be notified on.
Search - Finally, the search box in Facebook can be a powerful tool that can be used to quickly find any current friends or people on Facebook. In addition searching for terms such as a company name, product, sports team, music band, etc. will find fan pages and groups that can be joined.
Modify your account notifications
Keep your e-mail and your cell phone clean by updating or eliminate Facebook notifications or keep more up-to-date by adding new notifications. Facebook notifications can be added and removed by clicking Account link in the top right corner, then Account Settings, and then clicking the Notifications tab.
Top News and Most Recent
Facebook News and most Recent
By default Facebook will display your wall postings in the News format, which means it only displays posts it believes are most relevant to you. These results are based on your past interaction with your friends. If you want to see every post made by all your friends that are not hidden click the Most recent link in the upper right section of your news feed as shown in the above picture example.
If you want to adjust who shows up manually click the Edit Options in the bottom right corner of your news feed.
Facebook unhide friends
View High School work friends
If you've added your High School or previous Work locations to your profile, quickly see all classmates and co-workers on Facebook by clicking the link in your Info tab under your profile.
Quickly change profile picture
Your profile picture can be quickly changed to any other picture by visiting your profile, hovering the mouse over your current profile picture, and clicking the Change Picture link that appears in the top right corner of the picture.
Don't post private information on friend's walls on in comments
When you make a post on a friend's wall or in any of their comments realize that any of their friends are going to be able to see that post. If you wish for something to remain only between you and a friend send them a Facebook message instead.
Suggestions and random friend invites
As you get more friends on Facebook it will begin making friend, groups, and fan suggestions. These are suggestions made by Facebook and not your friends. Unless these are something you're interested in they can be ignored.
This same rule can be applied to people who may want to be your friend that you don't know. If you don't know someone don't accept his or her friend invite. Once someone becomes your friend they'll have access to any information your friends are capable of seeing.
Tag your Facebook friends in your photos
Always make sure to tag any of your Facebook friends that are in pictures you upload. However, never tag someone who is not in the picture. When someone is tagged in a photo that picture is automatically added to that persons profile and is a great way to share pictures with all friends.

Sunday, December 30, 2012

How To: Install Windows 8 From USB Drive

We are going to show you how to create Windows 8 bootable USB using both the Command Prompt.

Method 1: Command Prompt method

Things you need:
# Windows 8 DVD or ISO file
# 4GB USB flash drive
# A computer running Vista or Windows 7
(If you are running Windows XP, we suggest you follow method 2)
Method 1: Command Prompt method
Step 1: Connect your USB flash drive to your Vista or Windows 7 machine and backup all data from the flash drive.

Step 2: Open Command Prompt as administrator. To do this, go to Start menu, All programs, Accessories, right-click on Command Prompt entry and click Run as administrator option. Click Yes when you see the UAC prompt. If you are asked to enter the admin password, please do so.
Install Windows 8 From USB Rufus Picture1
Step 3: In the Command Prompt, type DISKPART and press enter key.

Step 4: Next, type LIST DISK and press enter key again. Note down the your USB flash drive number. For instance, in the below picture, my USB flash drive’s disk number is Disk 1. And if you can’t see your USB drive in the list, reconnect the drive and try again.
Install Windows 8 From USB Step2
Step 5: Type below mentioned commands one-by-one and press Enter key after entering each command.

Select Disk 1
(Enter the disk number that you have obtained in step 4)
Clean
Create Partition Primary
Select Partition 1
Active
Format FS=NTFS Quick
Assign
Exit
Install Windows 8 From USB Step3
Please don’t close the Command Prompt. Simply minimize it for now.

Step 6: Insert your Windows 8 DVD into to the optical drive and note down the drive letter of the optical drive. As you can see, “G” is my DVD drive’s drive number.

And if you have an ISO file of Windows 8, you need to mount the ISO file. To do that we suggest you check out our how to mount ISO file in Windows 7 guide. When you mount the ISO file using the instructions mentioned in our guide, you get a drive letter for your mounted optical drive. Simply note down that drive letter and proceed to the next step. For instance, in the below picture, “J” is the drive letter of my mounted ISO file.
Install Windows 8 From USB Rufus Picture5

Step 7: Maximize the Command Prompt and execute the following commands.

J: CD Boot
(replace “J” with your DVD or mounted ISO’s drive letter)

CD Boot

Step 8: Next, we need to update the USB flash drive with BOOTMGR compatible code. To do that type the below mentioned command and press Enter key.

Bootsect.exe /NT60 I:
(replace “I” with your USB flash drive’s drive letter)
Install Windows 8 From USB Rufus Picture4
Step 9: Well, we are almost done! Open up the DVD drive or mounted ISO drive, and copy all files to the USB flash drive. That’s it! You are ready to install Windows 8 from USB flash drive now.
Install Windows 8 From USB Guide