Thursday, April 4, 2013

How to Install Red Hat Enterprise Linux 5


How to Install Red Hat Enterprise Linux 5


I am going to demonstrate a typical RHEL 5 (Red Hat Enterprise Linux 5) installation in this article. I usually do this kind of installation to host oracle test databases. It should be a good start for you and off course you can customize this process a little bit to suite your environment. I will use a DVD media for RHEL 5.
1. You need to put the DVD in your computer and boot the computer from that DVD.
2. Next the installer will offer you if you want to check the DVD media before installation. Choose skip here.
3. Next you will see the first page of the Installation wizard. Press Next.
4. Select the Language that will be used in the rest of the installation.
5. Select the keyboard type.
6. Next you will be asked to put your installation number. You may skip entering this number if you don't have one.
7. Now you need to tell what do you want to do with your disk. I usually choose "Create custom layout" and create the partitions I need on the disk.
8. Here is our disk all free space if this is a fresh disk. This is a 30gb disk. Click "New" to create a partition.
9. First partition will be boot partition size 100m. This will allow the OS to keep the boot record on a separate partition.
10. The second partition will be /tmp. The size of /tmp depends upon the oracle database I am going to install e.g. Oracle 10g requires 400mb of space in /tmp and Oracle 11g requires at least 1gb. I will create /tmp with a size of 1.5gb.
11. Then comes the swap partition. The swap's size is dependent on the amount of physical RAM you have. I have 2G of RAM so the swap should be 1.5 times of 2G i.e. 3G. (This formula works for both Oracle 10g and 11g.)
12. The fourth partition will be /u01, a partition that will be used specifically for oracle software and database files. I am setting the size to 15gb.
13. The fifth partition is the "/" which is the root mount point for the operating system. We give it all the space left on the disk.
14. This is how your partitioning scheme should look like when you are done.
15. This screen will ask you if you want to keep the boot record on the disk or not. Keep the defaults and press next.
16. Here we will configure the network. Provide a hostname manually. Then click the Edit Button against Network Devices, disable the ipv6 and provide a static IP Address for IPv4. NO DHCP.
17. Click on the map to choose a region for your Time Zone.
18. Provide the password for the root (Administrator User in Linux) user.
19. Select the OS packages that you need. Mostly leaving it as default should be okay. But it is a nice idea to install some development packages which oracle may need while installation. Select "Customize now" and press Next.
20. All packages are listed. Right click on the package category and press "Select all optional packages" to install every thing in that category.
21. Press next here, to start the installation.
22. This will take several minutes, before the installation is complete. Once the installation is complete the system will reboot. Remove any media from DVD before the system restarts.
23. After rebooting you will have to do some setup tasks. This is the Welcome page of the setup wizard. Press Next.
24. Accept the license agreement and pres Next.
25. Disable the firewall and press Next.
26. Set SELinux "Disabled". If you leave it at "enforcing" you are gonna have trouble with oracle later for example you may not be able to start "sqlplus".
27. Leave kdump disabled.
28. Set the date and time.
29. Select to register at a later time.
30. If you have chosen not to register then this page shows that your system is not setup for Updates.
31. Use this page to create any additional users other then root.
32. Setup your sound card.
33. Use this page to install any additional software. Press Finish when done. The system will reboot again.
34. After reboot you will see the login screen. Login as root here using the password you provided during the install.
35. This is your RHEL 5 desktop. The installation is successful.
·  Desktop


Monday, April 1, 2013

Windows 8 Keyboard Shortcuts Key


In these key combinations, hold down the Windows key (normally located between Alt and Ctrl) and another key, as described on this list...
  • Press the Windows key to enter the tiled Start screen.
  • The Windows key + M minimizes everything that's showing on the desktop.
  • The Windows key + E opens Explorer for quick access to folders.
  • On the Start screen, press the Windows key + D to instantly get to the desktop.
  • The Windows key + Tab opens a list of currently running programs.
  • The Windows key + Print Screen takes a screenshot and saves it in a Screenshots folder nested in your Pictures folder. 
  • To take a screenshot on a Windows 8 tablet, simultaneously press the Windows button and the volume-down button on the tablet chassis.
  • The Windows key + Q opens a global search menu. Type what you're looking for and where you would like to look.
  • The Windows key + W opens a search in your system settings to quickly locate and change system properties.
  • The Windows key + F opens a file and folder search.
  • The Windows key + Pause opens the system properties page to show you a quick rundown of your specs.
  • The Windows key + "," (that's the comma sign!) makes all current windows transparent, giving you a peek at the desktop as long as you hold down the Windows key.
  • The Windows key + "." (the period) snaps a window to the right or left side (toggling each time you press ".").
  • The Windows key + R prompts the Run command—useful for quickly launching apps and other routines with a command prompt.
  • The Windows key + X opens the Quick Access Menu, exposing system functionality such as the Command Prompt, Disk Management, File Explorer, Run, and more. Alternatively, you can right-click on the bottom right corner of the screen to spawn the Quick Access Menu.
  • The Windows key + I opens the settings menu, giving you quick access to the Control Panel, Personalization, and your Power button, among other features.
  • The Windows key + O locks orientation on devices with an accelerometer.


Wednesday, March 20, 2013

Top 10 Best Firefox Security Add-ons

The main reason most people switch from  Firefox is to improve their browser security, but that doesn't mean Firefox is bullet-proof. We offer up the 10 best add-ons to make everyone's favorite opensource web browser even more secure.

1. Web of Trust (WOT) - You pretty much can't read a Firefox security article without learning about the Web of Trust (WOT) add-on -- and there's good reason. WOT rates every site on the Internet for its security risk: green equals safe, amber equals worrisome and red means avoid like the plague. Simple, easy, and a must-have security measure.

2. AdBlock Plus - The AdBlock Plus Firefox add-on says what it does, does what. AdBlock prevents most advertisements from loading -- especially Flash ads and those layered takeover ads that slow your page loads down -- including all the tracking cookies most ads slip into your system. Even if you aren't paranoid about data-snooping, AdBlock will noticeably speed up your surfing.

3. LastPass - The LastPass Firefox add-on is the granddaddy of password managers. Create one master logon for LastPass itself and it will log you in to every other online service you've got an account with. Moreover, LastPass stops storing your passwords locally in the browser -- where they can be hacked -- and encrypts them into an online account you (and you alone) can access from anywhere. It also has some nice password generation and form auto-completion features, which makes account signups even safer and simpler.

4. BetterPrivacy - The BetterPrivacy Firefox add-on is designed to scrape away the most persistent tracking cookies that websites (and, especially, advertisers) use to profile your online activity. In particular, BetterPrivacy blows away Local Shared Objects (LSOs), the pernicious cookies left behind by Flash applications, videos and websites that most other extensions simply can't erase.

5. NoScript - JavaScript makes a lot of interesting functionality possible on the Web -- including nefarious clickjacking attacks. The NoScript Firefox add-on permits only JavaScript from trusted domains to run in your browser, preventing any unsavory functions from occurring behind the scenes.

6. BugMeNot - It seems every site on Earth wants you to create an account to view their content these days -- mostly so they can track your surfing (even offsite) and sell your data to advertisers (as in spammers). The easiest way to avoid this constraint is the BugMeNot add-on, which provides anonymous credentials for most major sites, allowing you to login without creating or using a "real" account.

7. SpamAvert.com - Where BugMeNot stops, the SpamAvert Firefox add-on picks up. SpamAvert creates quick, disposable e-mail addresses you can use to enroll at sites you don't intend to visit again. The fake e-mail accounts allow you to complete registration, but they also take the hit for follow-up spam, keeping your real accounts clear of the clutter.

8. Beef TACO - The Beef Targeted Advertising Cookie Opt-out (TACO) blocks almost every type of tracking object from settling into your browser. If it's designed to report your web activity to dataminers or advertisers -- including the big dogs like Google, Facebook and Yahoo -- the Beef TACO swats it away. Combine this with BetterPrivacy and you'll be an ad-free phantom in no time.

9. Torbutton - For those that don't know, Tor is a proxy surfing service that prevents even your ISP (or employer) from knowing exactly what web sites you're visiting. The Torbutton Firefox add-on makes using the Tor service dead simple, which is a good thing given how easy it is to turn proxy-configuration a tangle of confusing options. If you want absolutely nobody to know where you've been online, the Torbutton is the place to start.

10. hideBad - Sometimes the biggest security or privacy threat is the one that's right over your shoulder -- literally. The hideBad Firefox add-on offers a browsing panic button that instantly closes every open tab in your browser (while saving the data so you can restore the session later) and replaces them with your homepage. It stops snooping eavesdroppers (and dangerously curious bosses) from knowing which web pages you were just surfing, which may be the most important security measure of them all.


Tuesday, March 12, 2013

Top 10 Most Popular Torrent Sites of 2013


1. The Pirate Bay

To many people The Pirate Bay is the equivalent to BitTorrent. The site was founded in 2003 and is still expanding, despite the various legal troubles and new blockades in the UK and the Netherlands. The Pirate Bay currently has well over a billion page views a month.
Alexa Rank: 74 / Compete Rank: 398 / Last year #1

2. KickassTorrents

KickassTorrents was founded in 2009 and has moved up in our top 10 year after year. Responding to increasing worries over domain seizures, the site moved from its kickasstorrents.com domain to kat.ph in 2012. This year the site continued to grow, despite being blocked by Italian Internet providers.
Alexa Rank: 116 / Compete Rank: 719 / Last year #3

3. Torrentz

Torrentz has been the leading BitTorrent meta-search engine for many years. Unlike the other sites featured in the list Torrentz does not host any torrent files, it merely redirects visitors to other places on the web. The site uses several domain names with the .eu being the most popular.
Alexa Rank: 166 / Compete Rank: 882 / Last year #2

4. IsoHunt

Two years ago isoHunt became the first search engine forced to implement a keyword filter provided by the MPAA. Despite this setback, isoHunt continues to be listed among the world’s top torrent sites. isoHunt is currently trying to get rid of the filter through the Appeals Court.
Alexa Rank: 213 / Compete Rank: 1,935 / Last year #4

5. ExtraTorrent

ExtraTorrent continues to gain more traffic and has moved up again in the top 10, now being the 5th most visited torrent site. This success didn’t go unnoticed to rightsholders groups such as the RIAA and MPAA who have called out ExtraTorrent as one of the top pirate sites recently.
Alexa Rank: 279 / Compete Rank: 1,973 / Last year #6

6. 1337x

1337x focuses more on the community aspect than some competitors. The site’s owners say they started 1337x to “fill an apparent void where it seemed there was a lack of quality conscience ad free torrent sites with public trackers.” The site moved up from spot 10 last year to 6th in 2013.
Alexa Rank: 1,031 / Compete Rank: 9,228 / Last year #10

7. EZTV

Unlike the other sites in the top 10, TV-torrent distribution group EZTV is a niche site specializing in TV content only. It was one of the newcomers last year despite being around for more than 7 years, and is relatively popular among Australians. Because of its focus on TV-content EZTV’s traffic varies in line with the TV-seasons.
Alexa Rank: 1,128 / Compete Rank: 16,622 / Last year #8

8. Bitsnoop

BitSnoop is one of the largest BitTorrent indexes, claiming to index a massive 19,091,736 torrent files at the time of writing. The site’s traffic continues to grow steadily, as do the DMCA notices that it receives.
Alexa Rank: 1,159 / Compete Rank: 5,648 / Last year #9

9. TorrentReactor

TorrentReactor is back in the top 10 after dropping off last year. A few months ago the site was blocked by a court order in Italy, but the site nonetheless continues to gain visitors.
Alexa Rank: 1,314 / Compete Rank: 4,530 / Last year #NA

10. H33t

H33T has been around for many years and has built a dedicated user base, mostly in Europe and Asia. Despite the wishes of the music industry, the site isn’t yet blocked by any court orders. The site made the news a few months ago when its owner took a stand against the avalanche of copyright takedown requests.


Saturday, February 23, 2013

How to Add Slideshow In Blogger


Hi guys, someone has asked me how to add slideshow in blogger a while ago. Therefore, now I want to share my answer to anyone who can visit my blog. This tip is not too hard, so I would expect that you can get to know how to add slideshow in your own blog easily. All right, let's do these steps:


  1.  Go to Google Picasa (you probably have a google account, don't you?)
  2. Upload your photo into a album that you want to make it as a slide show in your blog posts
  3. After you have uploaded your photos into a specific album, click on the album
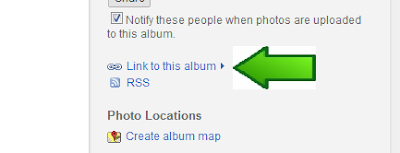
  4. Click on " Link to this album " (located in the right hand side)
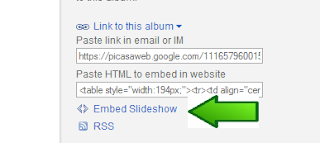
  5.  Click on " Embed Slideshow "
  6. Copy the code in the yellow box. 
  7. Now, you've already have the code, Go to create a new post
  8. Paste the code into the content box where you want your slideshow to be displayed 
  9. Click on Preview to check the result, then Click on Save or Publish. 
You're done
Note: You can place your slideshow anywhere in your blog by copying the slideshow code into a Gadget. 

You can go back to Blog on Blogspot home page to get the latest tips 

Monday, February 4, 2013

How To Disable Four Firefox Alerts

Here are a few Firefox tips for disabling Alert Windows:

Turn off the Download Manager notification in the right corner of the screen:

  1. Open Firefox, type “about:config” (without the quotes) in the URL bar and press the Enter key. NOTE: If you see a warning, confirm that you want to access the page.
  2. Using the Filter bar at the top of the browser, locate the following preference key: browser.download.manager.showAlertOnComplete
  3. Double-click that key to toggle it’s value to False, and then restart Firefox.

Turn off the Download Manager window when downloading a file:

  1. Open Firefox, click on the Upper Left Firefox Menu button (Orange Button) or use the Tools dropdown menu and click Options.
  2. From the Options window, select the General tab.
  3. Uncheck the option under Downloads: “Show the Download window when downloading a file”
  4. Uncheck the option under Downloads: “Close it when all downloads are finished”

Close the Download Manager window when all downloads are complete:

  1. Open Firefox, click on the Upper Left Firefox Menu button (Orange Button) or use the Tools dropdown menu and click Options.
  2. From the Options window, select the General tab.
  3. Check the option under Downloads: “Show the Download window when downloading a file”
  4. Uncheck the option under Downloads: “Close it when all downloads are finished”

Turn off the Out-of-date and Missing Plugin Firefox Warnings:

  1. Open Firefox, type “about:config” (without the quotes) in the URL bar and press the Enter key. NOTE: If you see a warning, confirm that you want to access the page.
  2. Using the Filter bar at the top of the browser window, locate the following preference key: plugins.hide_infobar_for_missing_plugin
  3. Double-click that key to toggle it’s value to True.
  4. Using the Filter bar again, locate the following key: plugins.hide_infobar_for_outdated_plugin
  5. Double-click that key to toggle it to True, and then restart Firefox.


How to Hide The Posting Time in Blogger

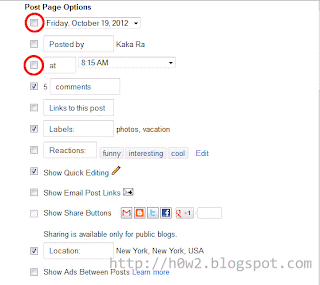
At default when you post an article in Blogger (blogspot), will appear the time. year, month, day, date, hour and minute. We can customize the time of post whether need to be shown or hidden.

In new blogger editor, we can easily make to show or hide the time in the post, without going to edit the html page.

Login to Blogger
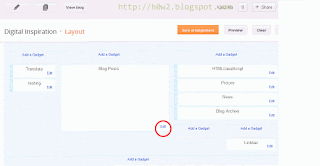
Go to Layout menu

In the blog posts area, click Edit

Click on figure to enlarge


Give a tick at option that you want to show, or remove a tick if you want to hide.


Click Save button