Saturday, October 28, 2017

Step by Step Configuring Transactional Replication in SQL Server 2008 R2

Step by Step Configuring Transactional Replication in SQL Server 2008 R2

There are 3 steps involved for Configuring the Transactional Replication:

1.Configuring the Distribution Database.
A database which contains all the Replication commands. Whenever any DML or DDL schema changes are performed on the publisher, the corresponding commands generated by  SQL Server are stored in the Distribution database. This database can reside on the same server as the publisher, but it is always recommended to keep it on a separate server for better performance. Normally, I have observed that if you keep the distributoion database on the same machine as that of the publisher database and if there are many publishers then it always has an impact on the performance of the system. This is because for each publisher, one distrib.exe file gets created. 
2.Creating the publisher.
The Publisher can be referred to as a database on which the DML or DDL schema changes are going to be performed.
3.Creating the subscriber.
The Subscribers the database which is going to receive the DML as well as DDL schema changes which are performed on the publisher. The subscriber database normally resides on a different server in another location.

How it works

Transactional replication is implemented by the Snapshot Agent, Log Reader Agent, and Distribution Agent. The Snapshot Agent prepares snapshot files containing schema and data of published tables and database objects, stores the files in the snapshot folder, and records synchronization jobs in the distribution database on the Distributor.
The Log Reader Agent monitors the transaction log of each database configured for transactional replication and copies the transactions marked for replication from the transaction log into the distribution database. The Distribution Agent moves the initial snapshot jobs and the transactions held in the distribution database tables to Subscribers.


Configuring the Distribution Database


Creating the Publisher


Creating the Subscriber


Tuesday, February 28, 2017

Windows 2012 No Remote Desktop License Servers Available

Customer site is running Windows Server 2012 Essentials and a Windows 2012 Terminal Server. User contacts me to report that she was unable to connect into the Terminal Server from Remote Web Access (RWA). I tried, and got the same error message when I tried to access the Terminal Server:
The remote session was disconnected because there are no Remote Desktop License Servers available to provide a license. Please contact the server administrator
I knew it was not an RWA issue because I could RWA into the 2012 Essentials server. A quick search and I found a post that indicates that there is a bug with 2012 RDS session hosts where they will not look to the licensing server for CALs when the grace period ends. Although I would like a permanent fix, the following solution resolved the crisis at hand.
The solution is to delete a specific registry key relating to the grace period, and then reboot the server.
  1. Open up the registry editor on the Terminal Server
  2. Browse down to: HKLM\System\CurrentControlSet\Control\Terminal Server\RCM
  3. Make a backup copy of the GracePeriod registry key
  4. Then you can Delete the GracePeriod registry key
    image
  5. Note: if you are not able to delete the key, you need to give yourself permission:
    Right click on the GracePeriod key and assign ‘full control’ permission to the administrator account.
    You should then be able to delete the key.
 Please see below step....

Step 1

access registry key permissions in windows 7 vista

Step 2

In the Permissions window that appears, Click Advanced.
advanced permissions window for registry in wnidows 7 vista

Step 3

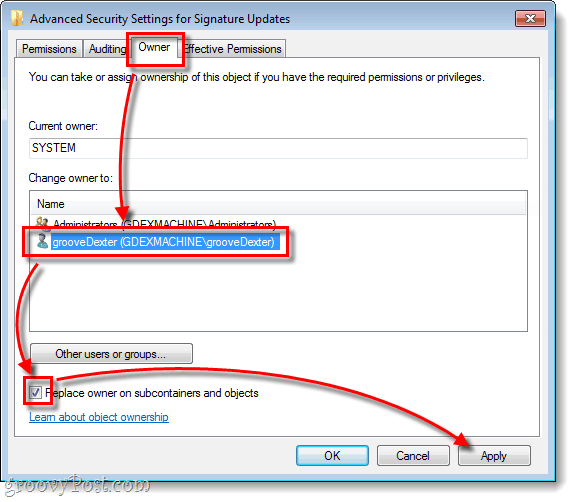
Click the Owner tab and Select your username from the list.* Now Check the Replace owner box and Click Apply. (Yes! This is one of the few instances where the Apply button is actually useful!)
*If your username is not on this list Click Other users or groups and manually add it.
change windows 7 or vista ownership of registry key

Step 4

Click the Permissions tab and then the Add button.  In the Select User window Type your username into the white box and Press OK.
add a new user to the full permissions list in registry editor

Step 5

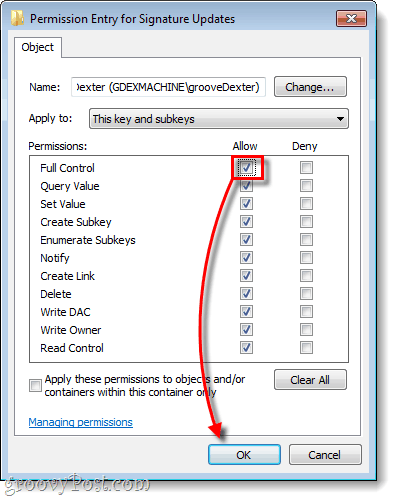
A new Permission Entry window should pop-up; just Check the Allow Full Control box and Click OK.
set your username to full control in registry editor for windows 7 or vista

Step 6

Back on the previous window, your username should be on the list with Permissions set to Full Control.  Now all that is left to do is to save and exit all open windows by Clicking OK a couple of times.
your user should appear on the list with full control, click ok to save changes to registry editor


6.Reboot the server and check it out.

Tuesday, November 1, 2016
Accesing Microsoft SQL Server Linked Servers

What are Microsoft SQL Server Linked Servers?
“Linked Server” is a feature of MS SQL Server that allows access to non-SQL Server databases through SQL Server. Only SQL Server Developer and SQL Server Enterprise versions support Linked Servers. SQL Server Express edition has several limitations that do not allow configuring or using Linked Servers.
A Linked Server enables the SQL Server Database Engine to execute commands against OLE DB data sources outside of the instance of SQL Server. Many types of OLE DB data sources can be configured as linked servers such as  Microsoft Access, Excel, another instance of SQL Server, etc.
Linked servers offer the following advantages:
  1. Remote server access.
  2. The ability to issue distributed queries, updates, commands, and transactions on heterogeneous data sources across the enterprise.
  3. The ability to address diverse data sources similarly.
A linked server definition specifies the following objects:
  • An OLE DB provider: DLL that manages and interacts with a specific data source
  • An OLE DB data source: Identifies the specific database that can be accessed through OLE DB (although data sources queried through linked server definitions are ordinarily databases, OLE DB providers exist for a variety of files and file formats.)

How to configure a SQL Server Linked Server to connect to Denodo?

Virtual DataPort provides access to ODBC clients through the PostgreSQL ODBC driver. To install the driver, follow the steps of the Virtual DataPort Developer Guide Section “Access through ODBC”.
Once the DSN to a Denodo database  is created on the system, a Linked Server to Denodo can be configured.
  1. Create a User DSN to a Server name (Server1)
odbc_admin.png
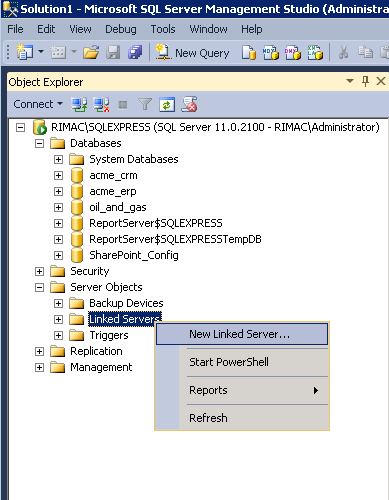
  1. Start the SQL Server Management Studio and under Object Browser expand Server Objects and right click Linked Servers as shown below:
  1. Click on New Linked Server. On the new window fill in the information as shown to create linked server under the General tab.
new_linked_server.png
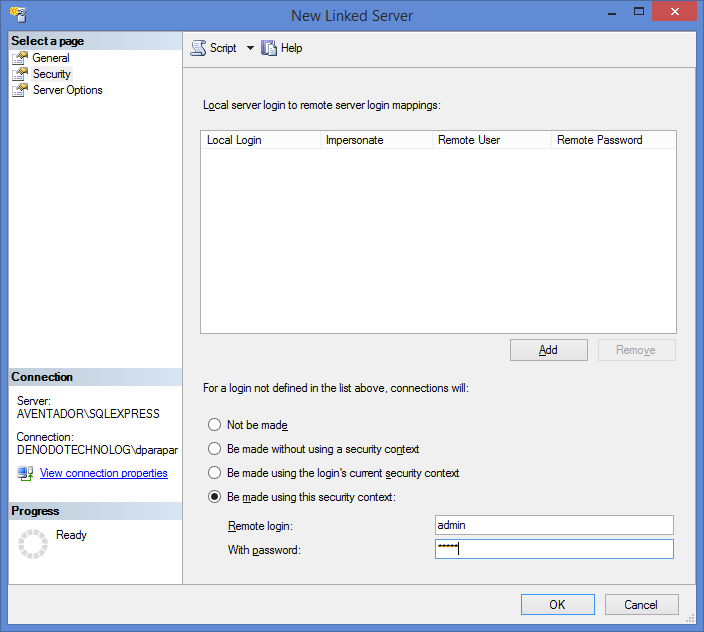
  1. On the Security tab, select the  ‘Be made using this security context’ option and enter the credentials to the Denodo Server.
  2.  Remote Login : SQL Server login user name : sa 
  3. Password : Sql Server Password : 123 
security_tab.png
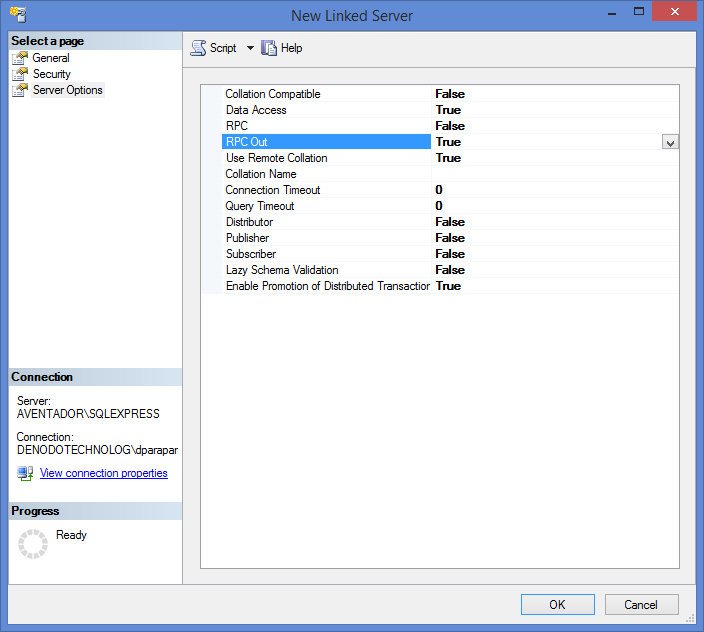
  1. Finally, under the Server Options tab, change RPC, RPC Out, and Lazy Schema Validation options to True (by default they are set to False).
server_options.png
  1. Click Ok, after making all the mentioned changes. This will create the linked server and it will be listed under SSMS Object Browser. Right Click on the new linked server and click on Test Connection
test_connection.png

Wednesday, October 12, 2016

How To Install Microsoft Security Essentials In Windows Server 2012 R2


Microsoft Security Essentials Installation Guide For Windows Server

    Download and Install

  1. Firstly you’ll want to download Microsoft Security Essentials onto your Windows server. Select the language of your choice and either 32-bit or 64-bit depending on the architecture your server operating system is using.
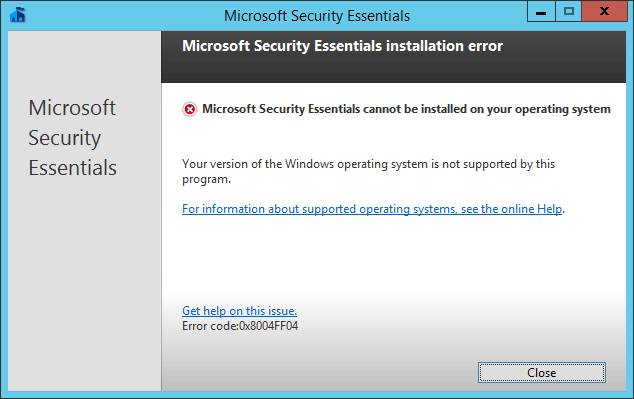
  2. Save the mseinstall.exe file somewhere locally on the server, do not simply run it as by default the installation will fail with the following error:
    Microsoft Security Essentials cannot be installed on your operating system.
    
    Your version of the Windows operating system is not supported by this program.
    
    Error code:0x8004FF04
    
    How to fix 0x8004FF04 error
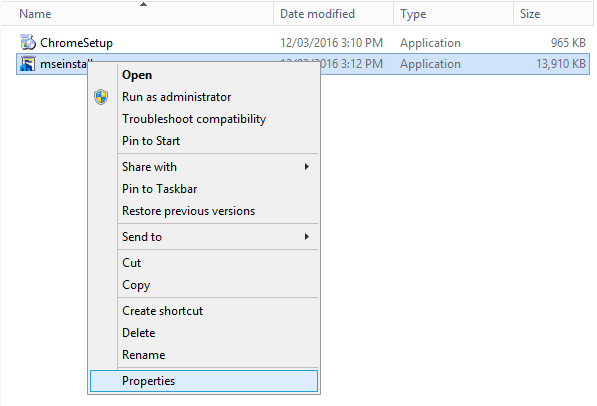
  3. To get around this error message, right click the mseinstall.exe file and select properties. mseinstall.exe properties
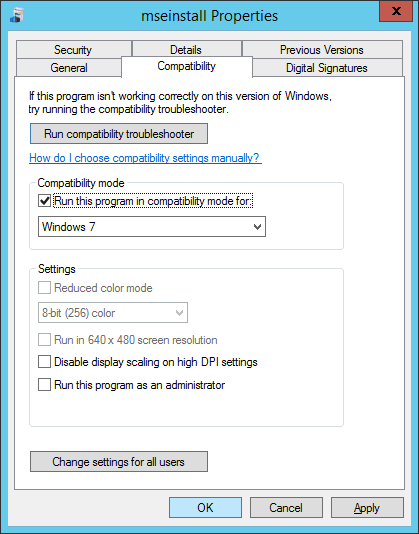
  4. From the properties window, select the compatibility tab. Within the compatibility tab tick “Run this program in compatibility mode for:” under Compatibility Mode and select Windows 7 from the drop down box, as shown. mseinstall.exe compatibility mode
    Click OK to continue.
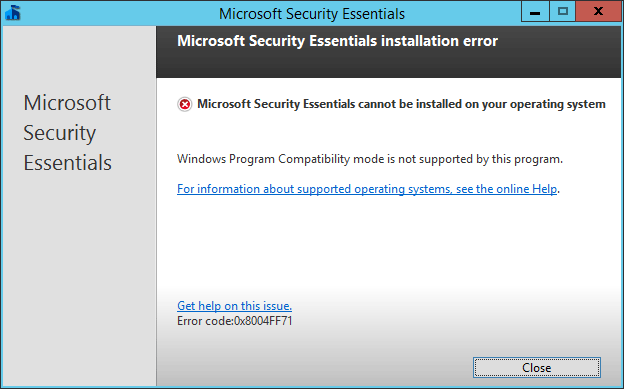
  5. If you were to run the mseinstall.exe file at this point, you would receive a different error as shown below:
    Microsoft Security Essentials cannot be installed on your operating system. 
    
    Windows Program Compatibility mode is not supported by this program.
    
    Error code:0x8004FF71
    
    How to fix error 0x8004FF71
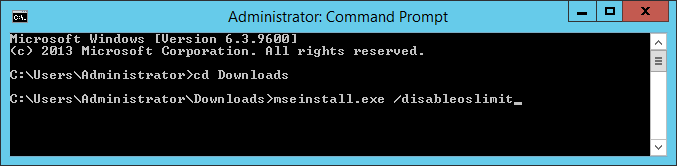
    In order to resolve this, run command prompt as administrator and enter the folder where the mseinstall.exe file is located. Run the mseinstall.exe file with the /disableoslimit flag on the end as shown below. cd C:\Users\Administrator\Downloads
    mseinstall.exe /disableoslimit
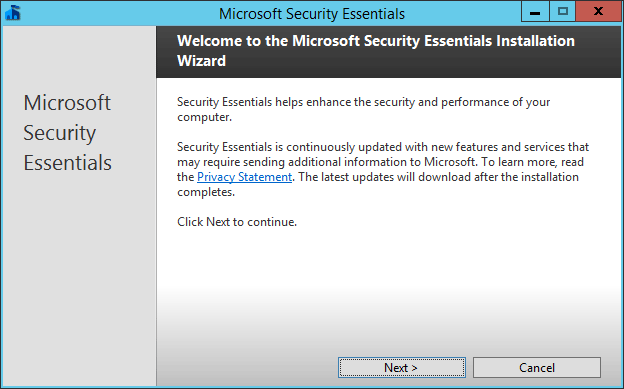
  6. The installation wizard should now correctly open and Microsoft Security Essentials can now be installed and will proceed without the previous error messages, click Next to continue and work through the installation wizard. install1
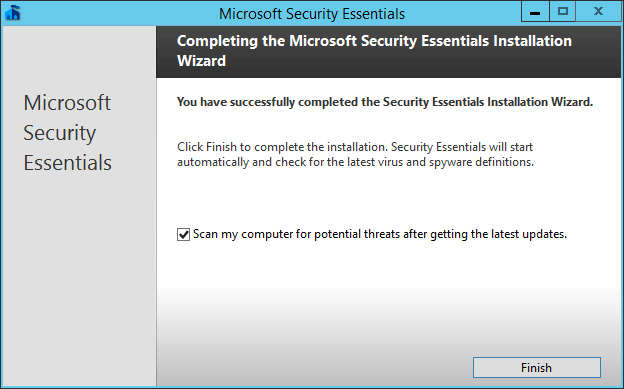
  7. Once the installation has completed you can optionally update and perform a scan, this is recommended as the definitions database needs to be kept up to date to find newer threats. An Internet connection will be required to download any available definition updates through the application, however these can also come through from Windows updates so if you have a WSUS server you can update from here as well. After updating a quick scan will take place. Microsoft Security Essentials Installation Complete
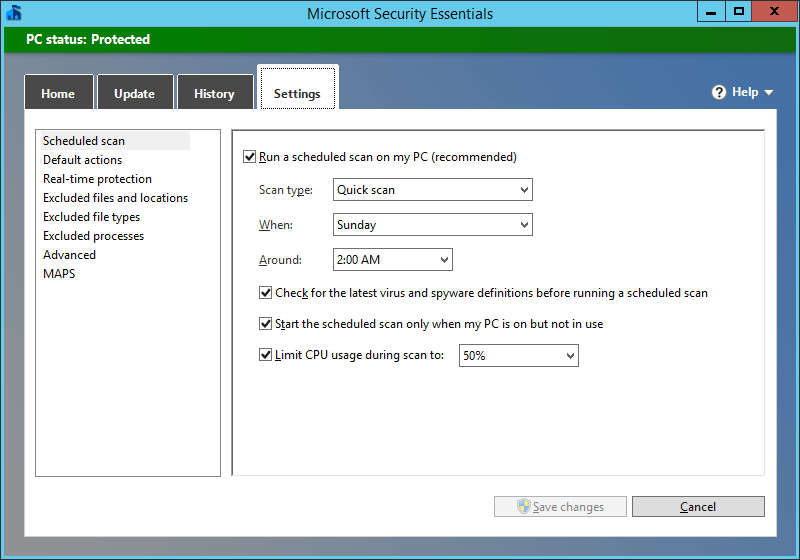
    You can select the Settings tab to modify when the weekly automatic scheduled scan takes place, by default a quick scan is set to run every Sunday at 2am and will not use more than 50% of the available CPU resources.
    Microsoft Security Essentials Default Settings
  8. Testing

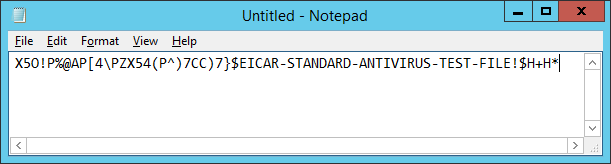
  9. Now that Microsoft Security Essentials has been successfully installed, we will test the actual functionality of the program to ensure that it will correctly identify a threat. To do this we will create a test EICARs file and see if the real-time protection automatically detects and quarantines it. Essentially we are just going to open Notepad and create a .txt file containing the test string defined on that page and then save it to the desktop.
    EICAR test file
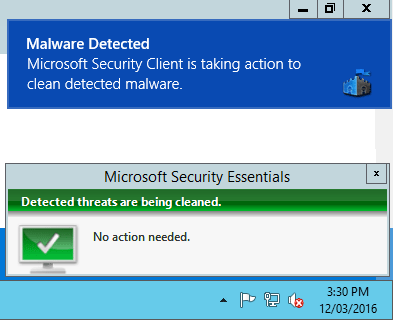
  10. Shortly after saving the file we have been visually alerted that malware has been detected and that Microsoft Security Client is taking action to clean the detected malware. Maleware detected
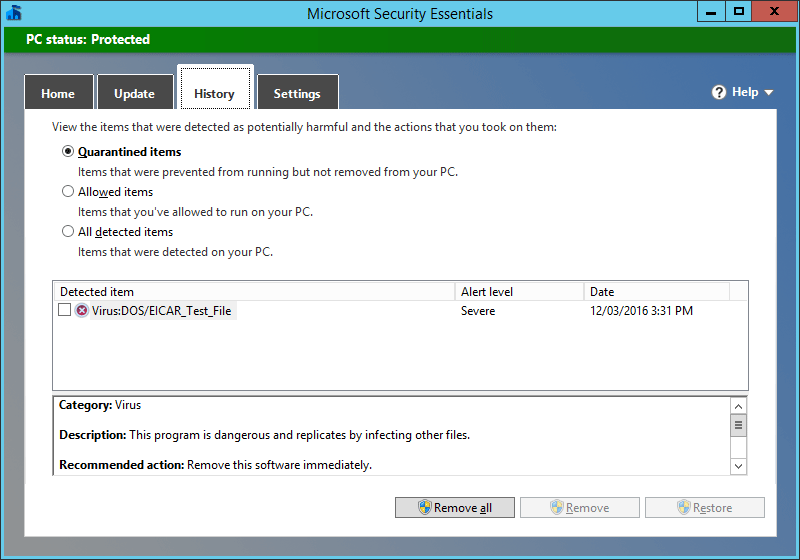
    If we check the History tab of Microsoft Security Essentials we can then see the test file listed as a quarantined item, confirming that it is working correctly as intended in Windows Server 2012 R2.
    Malware quarantined

Summary

Although not officially supported, we have successfully installed Microsoft Security Essentials (a cut down Windows Defender) in Windows Server 2012 R2 and confirmed that it is working correctly and detecting security threats.
This is better than the default level of security, which is none as Windows Defender is only built into Windows 8, 8.1 and 10 client operating systems, however it is recommended that server operating systems make use of enterprise solutions such as System Center Endpoint Protection (SCEP) or some other option available from some security vendor.